Installing a custom plugin in WordPress may sound complicated, especially if you have never worked with plugin files before. But if you already have the plugin as a ZIP file, the process is usually straightforward.
Unlike plugins installed directly from the WordPress Plugin Directory, a custom plugin is often provided as a ZIP file by a developer or created specifically for your website. WordPress allows you to install these plugins directly from the admin dashboard or upload the plugin files manually to your server.
What Is a Custom WordPress Plugin?
A WordPress plugin is a package of code that adds new functionality or changes how your WordPress website works. Plugins can contain PHP code along with CSS, JavaScript, images, and other files.
A custom plugin is usually created for a specific website or requirement. For example, a developer might create a custom plugin to:
- Add a custom feature to your website
- Create a custom shortcode
- Modify WooCommerce functionality
- Add an admin dashboard feature
- Connect your website with another service
- Add custom forms or tools
- Automate a specific website task
One important advantage of using a plugin for custom functionality is that you can add features without directly modifying WordPress core files. WordPress recommends keeping custom functionality outside the WordPress core because core files can be overwritten during updates.
Before You Install a Custom Plugin
Before uploading any custom plugin, make sure you have the correct plugin package.
Usually, the developer will provide a file similar to:
my-custom-plugin.zip
Do not extract the ZIP file if you plan to install it through the WordPress dashboard. WordPress can install a plugin directly from its ZIP archive.
It is also a good idea to make a current backup of your website before installing a plugin, particularly if the plugin contains custom PHP code or changes important website functionality.
You should also make sure that the plugin comes from a source you trust. A custom plugin can have extensive access to your WordPress website, so installing unknown or modified plugin files can create security problems.
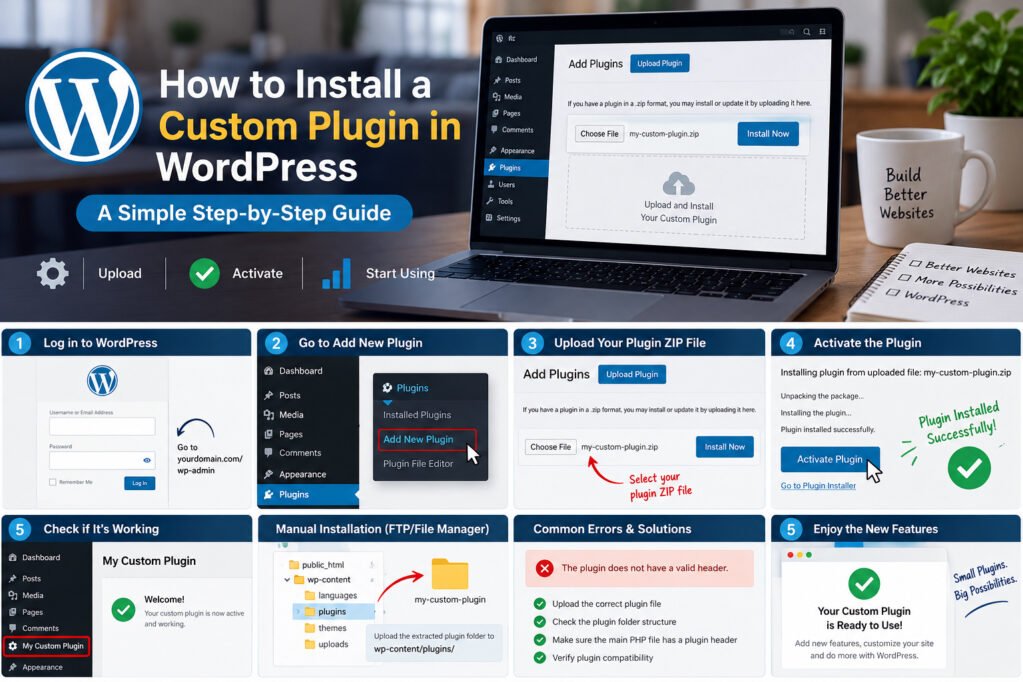
Method 1: Install the Custom Plugin from the WordPress Dashboard
This is usually the easiest method when you have the plugin in ZIP format.
Step 1: Log In to WordPress
Log in to your WordPress administration dashboard.
Your dashboard is normally available through:
yourdomain.com/wp-admin
Once you are logged in, you will see the WordPress admin menu on the left side.
Step 2: Open the Plugins Section
From the WordPress dashboard, go to:
Plugins → Add New Plugin
This opens the plugin installation screen.
Step 3: Choose Upload Plugin
Look for the Upload Plugin button near the top of the page.
Click it to open the plugin upload option. WordPress officially supports uploading a plugin as a ZIP archive through the admin area.
Step 4: Select Your Plugin ZIP File
Click Choose File and select the custom plugin ZIP file from your computer.
For example:
my-custom-plugin.zip
Make sure you select the actual plugin ZIP file rather than another ZIP file containing unrelated website files.
Step 5: Install the Plugin
After selecting the ZIP file, click:
Install Now
WordPress will upload and install the plugin on your website.
When the installation finishes successfully, WordPress will display a confirmation message.
Step 6: Activate the Plugin
After installation, click:
Activate Plugin
The plugin will now become active on your WordPress website.
You can also activate or deactivate installed plugins later from the main Plugins page.
How to Check Whether the Custom Plugin Is Working
Installing a plugin successfully does not always mean that its feature is working exactly as expected.
After activation, check the functionality the plugin was designed to provide.
For example, if your custom plugin adds:
- A new menu in WordPress
- A shortcode
- A WooCommerce feature
- A settings page
- A custom admin dashboard
- A new website feature
visit the relevant area and test it.
If the plugin has its own settings page, configure the required options before testing the feature.
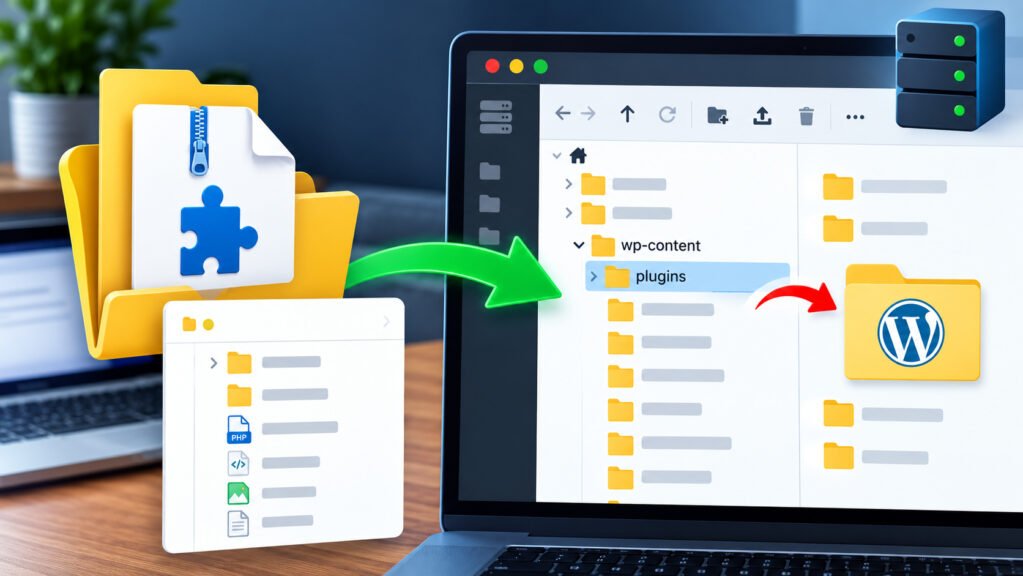
Method 2: Manually Install a Custom Plugin
Sometimes you may not be able to install the plugin through the WordPress dashboard. In that situation, you can upload the plugin files directly to your server.
This method is more suitable for advanced users and developers because it requires access to the website’s files through SFTP or a server file manager. WordPress documentation describes manual installation as transferring the extracted plugin folder into the plugins directory and then activating it from the WordPress admin area.
Step 1: Extract the Plugin ZIP File
First, extract the custom plugin ZIP file on your computer.
For example, you might get a folder named:
my-custom-plugin
Inside the folder, you should see the plugin’s files.
A typical plugin can contain a main PHP file along with other PHP, CSS, JavaScript, image, or related files.
Step 2: Open Your Website’s Plugin Directory
Using your hosting file manager or an SFTP client, locate the WordPress plugins directory.
A typical WordPress installation uses:
wp-content/plugins
WordPress notes that plugin files are commonly located within the plugins directory, although developers should not assume a hard-coded wp-content path when writing plugin code because WordPress installations can be configured differently.
Step 3: Upload the Plugin Folder
Upload the extracted plugin folder into the plugins directory.
For example:
wp-content/plugins/my-custom-plugin/
Do not accidentally create an unnecessary extra folder level such as:
wp-content/plugins/my-custom-plugin/my-custom-plugin/
unless the plugin was specifically packaged that way.
Step 4: Open the Plugins Page
Go back to your WordPress dashboard and open:
Plugins → Installed Plugins
You should see the custom plugin listed there.
Step 5: Activate the Plugin
Find your custom plugin and click:
Activate
WordPress will load the plugin and enable its functionality.
Common Custom Plugin Installation Problems
1. “The Link You Followed Has Expired”
This can happen when the uploaded plugin ZIP is larger than the limits configured by your hosting environment.
You may need to increase the relevant PHP upload limits or use manual installation through your hosting file manager or SFTP.
2. “Destination Folder Already Exists”
This usually means a folder with the same plugin name already exists on your server.
Check:
Plugins → Installed Plugins
You may already have an older version of the plugin installed.
Do not delete or replace the existing plugin without checking whether it contains important configuration or data.
3. Plugin Installs but Cannot Be Activated
The plugin may have a PHP error, missing dependency, compatibility problem, or another configuration issue.
First, check the plugin’s documentation and make sure the plugin requirements are satisfied.
If the plugin was custom-developed for your website, contact the developer rather than repeatedly activating and deactivating it.
4. Plugin Is Installed but the Feature Does Not Appear
Check whether:
- The plugin is activated
- The plugin requires configuration
- A shortcode needs to be added to a page
- Another plugin is required
- The feature is available only to certain user roles
- Your browser or caching system is showing an older version
If you use a caching plugin, clear the relevant cache after making changes.
How to Update a Custom Plugin
If the developer provides a newer version of your custom plugin, you may need to replace the existing plugin with the updated version.
Before updating, create a backup of your website.
Also check the developer’s instructions because some custom plugins store settings or data that should not be removed during an update.
Keeping plugins updated is important because plugin updates can include bug fixes, improvements, and security fixes.
How to Delete a Custom Plugin
If you no longer need a custom plugin, you can manage it from:
Plugins → Installed Plugins
Usually, you should Deactivate the plugin first and then use the available delete option.
Be careful when deleting custom plugins. Some plugins store settings or other data in the database, and deleting the plugin files does not necessarily mean that all plugin-created data is automatically removed.
The plugin developer’s documentation should explain what happens to its data during uninstallation.
Important Security Tips for Custom Plugins
Custom plugins can be extremely useful, but you should treat them like any other software installed on your website.
Only install plugins from developers or sources you trust.
Before installing an unfamiliar plugin, check:
- Who created the plugin
- What the plugin is supposed to do
- Whether it supports your WordPress setup
- Whether it requires another plugin
- Whether it is actively maintained
- Whether the plugin files have been modified
Avoid downloading “nulled” or pirated plugins. Besides legal concerns, modified plugin packages can contain malicious code.
If you are developing your own plugin, follow WordPress coding and security practices. The WordPress Plugin Developer Handbook covers areas such as data validation, sanitization, escaping output, nonces, and capability checks.
Final Thoughts
Installing a custom plugin in WordPress is easier than it may initially seem. If you have a properly packaged plugin ZIP file, the simplest approach is to upload it through Plugins → Add New Plugin → Upload Plugin, install it, and activate it.
If dashboard installation is not possible, you can manually upload the extracted plugin folder to your server and activate it from the WordPress Plugins page.
The most important part is not simply getting the plugin installed. Use trusted plugin files, keep a backup before making changes, and make sure the plugin is compatible with your website.
For developers who want to learn more about creating and maintaining WordPress plugins, the official WordPress Plugin Developer Handbook is a useful reference.
Explore more technology guides on our Blog.